We live and work in browsers. It’s where we spend most of our time — and it’s where we waste most of our time as well. Web browsing is slow, inefficient, and full of time-sapping annoyances.
But it needn’t be that way. You can turn your browser into a lean, mean productivity machine. To do it, just follow these tips for Microsoft Edge in Windows 10 or 11. You’ll learn how to switch between home and work profiles, put idle tabs to sleep to speed up your PC, tap into the power of Microsoft’s Copilot AI assistant, and more.
Note: These tips are written for the most recently updated version of Edge in Windows 11 25H2 and Windows 10 22H2. Things may be slightly different if you use a different Windows version, and not all of these features are available for Edge on macOS or other platforms.
1. Switch Between Work and Personal Profiles
With remote and hybrid work models now common, many people use the same device for work and personal use. When it comes to using a web browser, that can quickly become problematic.
Mixing work and personal favorites makes it far more difficult to quickly get to important work websites or personal websites. When you’re working, you don’t want to wade through hundreds of links to family photos, vacation destinations, and YouTube videos of cats befriending parrots when you’re just looking for the OSHA website about mine safety regulations. And when you’re off working hours and want to watch a video of a Persian cat nuzzling a cockatiel, a website detailing the GDPs of every country in Europe and Asia is not your primary destination.
Different profiles let you completely segregate your browser use. That doesn’t just mean different favorites. It also means different Collections, different extensions, different passwords, and more.
Each Edge profile is tied to a different Microsoft account. So to use different profiles, you’ll need to create different Microsoft accounts. To create a new Microsoft account in Windows 10 or 11:
- Go to https://account.microsoft.com. If you’re signed in to your account, click your profile icon or initials in the upper-right corner and select Sign out. Close Edge, restart it, and go back to https://account.microsoft.com.
- Scroll down to the button that says Create an account, click it, and follow the prompts to create a new account.
- On the page that appears, click the Sign in button in the middle of the page. On the screen that appears, select the Create one! link, then follow the prompts to create a new account.
You’ve now got two different Microsoft accounts you can use for Edge. When you log into one of those accounts in Windows, that will be the default account that Edge will use when you browse the web.
To switch between the two accounts, you’ll need to add that second account to Edge. To do it:
- Click the user profile icon at the top right of Edge. On the small pane that appears, select Set up a new profile, then select either Personal or Work or School.
- You’ll be sent to a web page in a new instance of Edge. Click the Sign in button at the far right, then select Sign in to sync data.
- On the screens that appear, sign in and confirm that you want to proceed.
Once you’ve done that, you don’t have to log out of your current account and then log into the second account to use it in Edge. Instead, when you want to use the second account, click the user profile icon at the top right of the Edge window. A small pane appears with your current profile at the top. To switch to your other profile, select it in the “Other profiles” section.
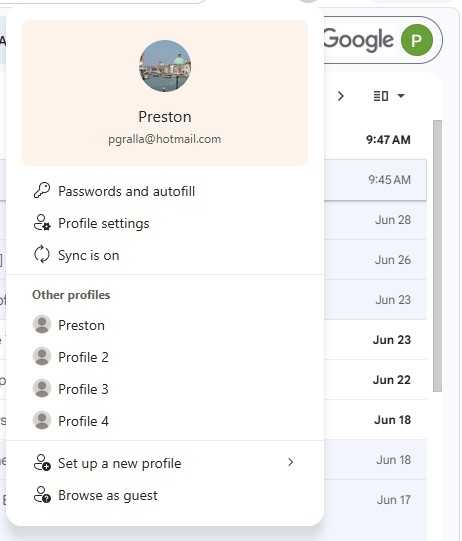
To minimize distractions, set up work and personal profiles in Edge.
You’ll now be sent straight to that profile. When you do that, Edge will open in a new window. So you’ll have both your profiles running simultaneously, each with its own tabs, in two separate windows. Note that you can set up multiple additional profiles.
You can also tell Edge which profile to use when you visit certain websites. To do it:
- Click the user profile icon in Edge and select Profile settings. (Alternatively, you can click the three-dot icon next to the user profile icon and select Settings > Profiles.)
- In the “Profile settings” area, click Profile preferences.
- At the bottom of the “Automatic profile switching” section on the page that appears, click Add site next to “Custom site switch.”
- On the “Add site” popup, enter a website URL and select the profile you want to switch to for that site.
Should you decide you want to remove a profile, go to Settings > Profiles and scroll to the “More profiles” section. Click the trash can button next to any profile you want to delete. You can always add it again later using the steps above.
2. Get to Your Most-Used Sites Quickly
Bookmarking and organizing favorites is a great way to manage a large collection of websites, but it’s not that useful if you simply want to get to a frequently used site quickly. Edge has some tricks up its sleeve if you want to get your most-used sites pronto.
Add a Site to the New Tab Page
When you open a new tab in Edge, a page appears that shows you news and other items you might be interested in. It’s easy to pin a site to this page so it’s accessible whenever you open a new tab.
Look toward the top of the page, just underneath the search box. If you don’t see icons for pinned pages (such as for Yahoo, Amazon, your inbox, and so on), click the settings icon on the upper right of the page (it looks like a gear) and turn “Quick links” on.
A row of site icons appears, along with a + icon. Click the + icon and type or paste in the name and URL of the site you want to pin, then click Add. The site will now appear along with the other pinned pages.
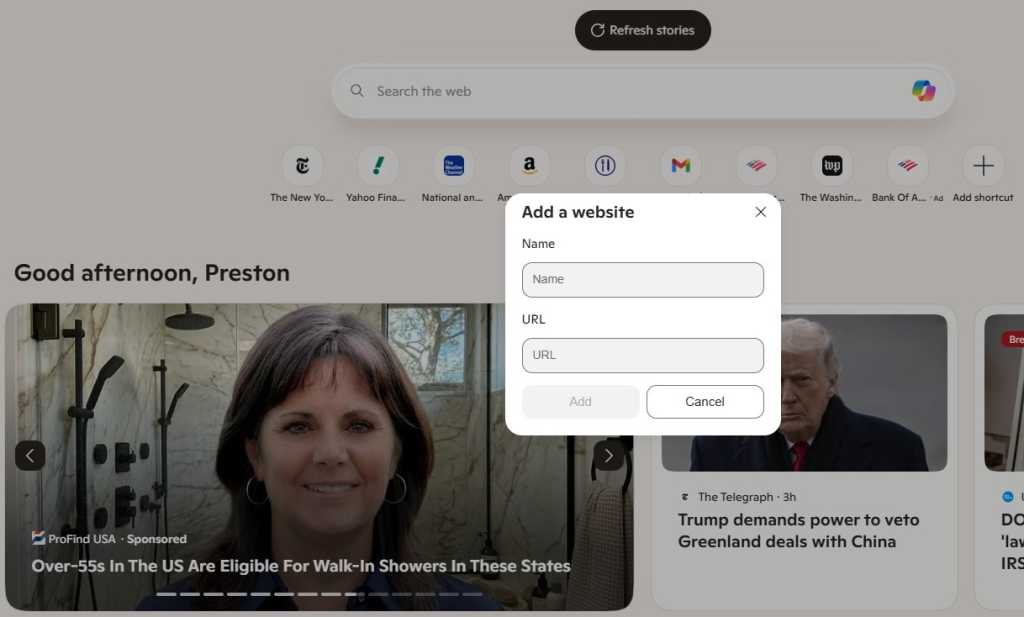
Pinning a site keeps it handy on the new tab page.
You can rename or remove any site pinned to the new tab page by clicking the three-dot icon next to the site icon and selecting Rename or Remove from the menu that appears.
The new tab page is tied to your current profile, so you can set up different pinned sites on the new tab page for each of your profiles.
Pin Tabs to the Top of Edge
For even faster access to frequently used sites, you can pin them as browser tabs so they appear at the far left of all your other tabs in Edge. When you’re on the site you want to pin as a tab in Edge, right-click its tab and select Pin tab from the menu that appears. The pinned tab will now appear to the left of all your open tabs.
The icon for the pinned tab looks smaller than all of your other tabs, and it will persist even after you shut down and restart Edge. If you have multiple pinned tabs, all of them will appear to the left of any non-pinned tabs.
Like pinned sites on the new tab page, your pinned tabs are unique to each Edge profile and won’t carry over from profile to profile.
Pin Sites You Often Visit to the Windows Taskbar
For Windows users, the fastest way to access a frequently used site is to pin it to the Windows taskbar. That means it’s always visible even when Edge isn’t running, and you can launch it with a single click.
When you’re on the site you want to pin, select the three-dot icon at the top right of the browser window and select More tools > Pin to taskbar. A small screen appears with a text box containing the name of the site. Use the name provided or type a new name into the text box and click Pin.
3. Create Tab Groups for More Efficient Browsing
If you’re like lots of people, you frequently browse with many tabs open and find yourself wasting time switching to the tab you want because of all the clutter.
There’s a simple fix: group tabs into categories so you can quickly switch to the tab group that has the tab you want. For example, you might group them into “News,” “Museums,” “Finance,” and so on. Or you could create a tab group for research related to a specific project.
To do it, right-click a tab, select Add tab to new group, and then name the tab group. You can then drag other tabs into the group. You can also assign each tab group a unique color so they’re easy to differentiate at a glance.

Creating tab groups makes it easier to find the tab you want quickly.
If you’ve already created a group, when you right-click a tab you’ll see “Add tab to group” rather than “Add tab to new group.” When you click the arrow next to it, you’ll see a list of all your existing groups, so you can easily add a tab to any of them.